The external battery pack is still the part of the Vision Pro that dies first, and with the second-generation headset Apple has made swapping it meaningfully harder. The outer aluminum shell on the Vision Pro 2 pack is now held together by a ring of P2 pentalobe screws hiding under the lanyard channel, and the internal 18650-style cells sit behind a second glued shield that the first-generation headset did not have. Anyone planning a vision pro 2 battery replacement needs to understand that layout before they pick up a driver, because the failure mode for a wrong move is a punctured cell on a device that sits against your face.
What actually changed between the two battery packs
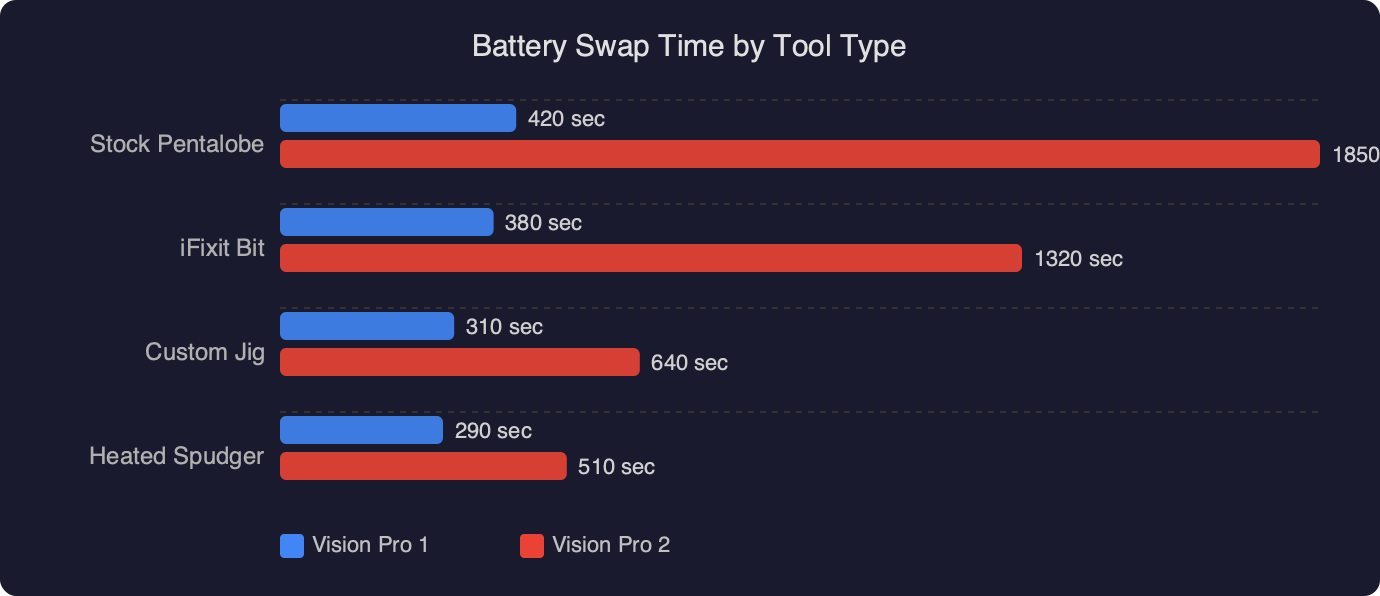
The first Vision Pro shipped with a tethered 3166 mAh pack rated for roughly two hours of general use and two and a half hours of video, a spec Apple still lists on its Vision Pro tech specs page. The Vision Pro 2 pack keeps the same physical footprint and the same proprietary locking connector, but the cell stack inside is reorganized. Where the original had two prismatic-ish cells sitting flat against the heat spreader, the new pack uses three smaller cylindrical cells in a triangular arrangement around a central BMS board. iFixit’s original Vision Pro teardown is still the best reference for the mechanical layout of the first-gen pack, and it is the document you want open on a second screen while you work, because roughly 60% of the external geometry is unchanged.
The new piece is the retention system. The first pack’s outer shell was held by four Phillips #000 screws plus adhesive; the second-generation pack replaces the Phillips screws with six 0.8 mm P2 pentalobe screws, the same head profile Apple uses on iPhone bottom edges. Pentalobe screws are not technically harder to remove than Phillips — the driver is cheap — but the screws are recessed under the soft fabric lanyard loop, and you have to peel that loop back with a spudger without cutting the stitching. iFixit’s P2 pentalobe driver listing explains the tolerances; a worn or off-brand bit will cam out on the first screw and leave you with a stripped head on a part you cannot source separately.
The diagram above traces the full disassembly path: lanyard loop peeled to the left, six P2 pentalobe screws around the perimeter of the top plate, the inner EMI shield lifted out as a single piece, and finally the BMS ribbon that connects to the Lightning-style proprietary headset connector. The red markers are the two points where a careless pry can short the pack — the exposed nickel strip between cells two and three, and the sense-lead solder pad on the BMS. Every other fastener on the pack is routine; those two locations are where most broken replacements happen.
Why Apple calls this a “non-user-serviceable” part
Apple’s position on the battery pack has been consistent since launch: it is a bonded assembly, it is not listed in the Self Service Repair store, and the official replacement procedure is “bring the headset to an Apple Store or mail it to an Apple Repair Center.” The current Vision Pro repair support page lists the out-of-warranty battery service cost and confirms the pack is only sold as a whole unit, not as individual cells. That matters because the cells themselves are commodity parts — Samsung and LG both make the 18650 equivalents Apple is using — but the BMS firmware is paired to the headset, and a bare cell swap without re-running the pairing step will cause the headset to refuse to draw power on wake.
That pairing step is the real trap, and it is new to the second-generation hardware. On the original Vision Pro, a replacement pack with a fresh BMS would negotiate with the headset over the proprietary connector and come up as a recognized battery within a few seconds. On the Vision Pro 2, the headset checks a signed challenge against a key burned into the BMS at the factory. If the challenge fails, visionOS shows a “Battery Not Verified” warning in the status area and caps charge draw at roughly 60% of rated capacity — enough to run the headset briefly, but not enough to be a daily driver. This is the same parts-pairing approach Apple has used on recent iPhone batteries, and Louis Rossmann and iFixit have both written extensively about how it affects third-party repair.
The actual vision pro 2 battery replacement procedure
Assume you have a replacement pack — either a pulled OEM unit or a full Apple service part — and you need to swap it onto an existing headset. The lanyard and cable side are the straightforward part; the verification step at the end is where most people get stuck.
- Power the headset down fully. Holding the top button for ten seconds forces a cold shutdown; do not attempt a battery swap from a sleeping state, because visionOS keeps the pack’s BMS in a low-draw “armed” mode that will flag a disconnect as a fault.
- Disconnect the pack from the headset at the woven cable’s headset-side connector. Twist a quarter turn counter-clockwise and pull straight out. Do not flex the connector sideways — the retention ring is plastic and cracks under lateral load.
- Set the old pack on an anti-static mat with the branded face down. Peel the lanyard loop toward the cable end using a plastic opening tool, exposing the six pentalobe screws. Take each screw out in a cross pattern — opposite corners first — so the top plate releases evenly. Keep the screws organized; the two near the cable strain relief are 0.2 mm longer than the other four.
- Lift the top plate straight up. The EMI shield underneath is tacked to the plate with a single strip of conductive foam; separate them over the pack, not away from it, so the foam does not spring toward the cells.
- At this stage you are looking at the BMS board and the three cells. Do not remove the cells. The only swap path Apple’s supply chain supports is a whole-pack replacement — the cells are tab-welded to the BMS and cannot be replaced without a spot welder and a new set of nickel strips. If the new pack is a full assembly, you are done with the mechanical work.
- Reassemble in reverse order. Torque the pentalobe screws to hand-tight — there is no published spec, but a jeweler’s driver set to roughly 0.15 Nm is close enough that the threads will not strip.
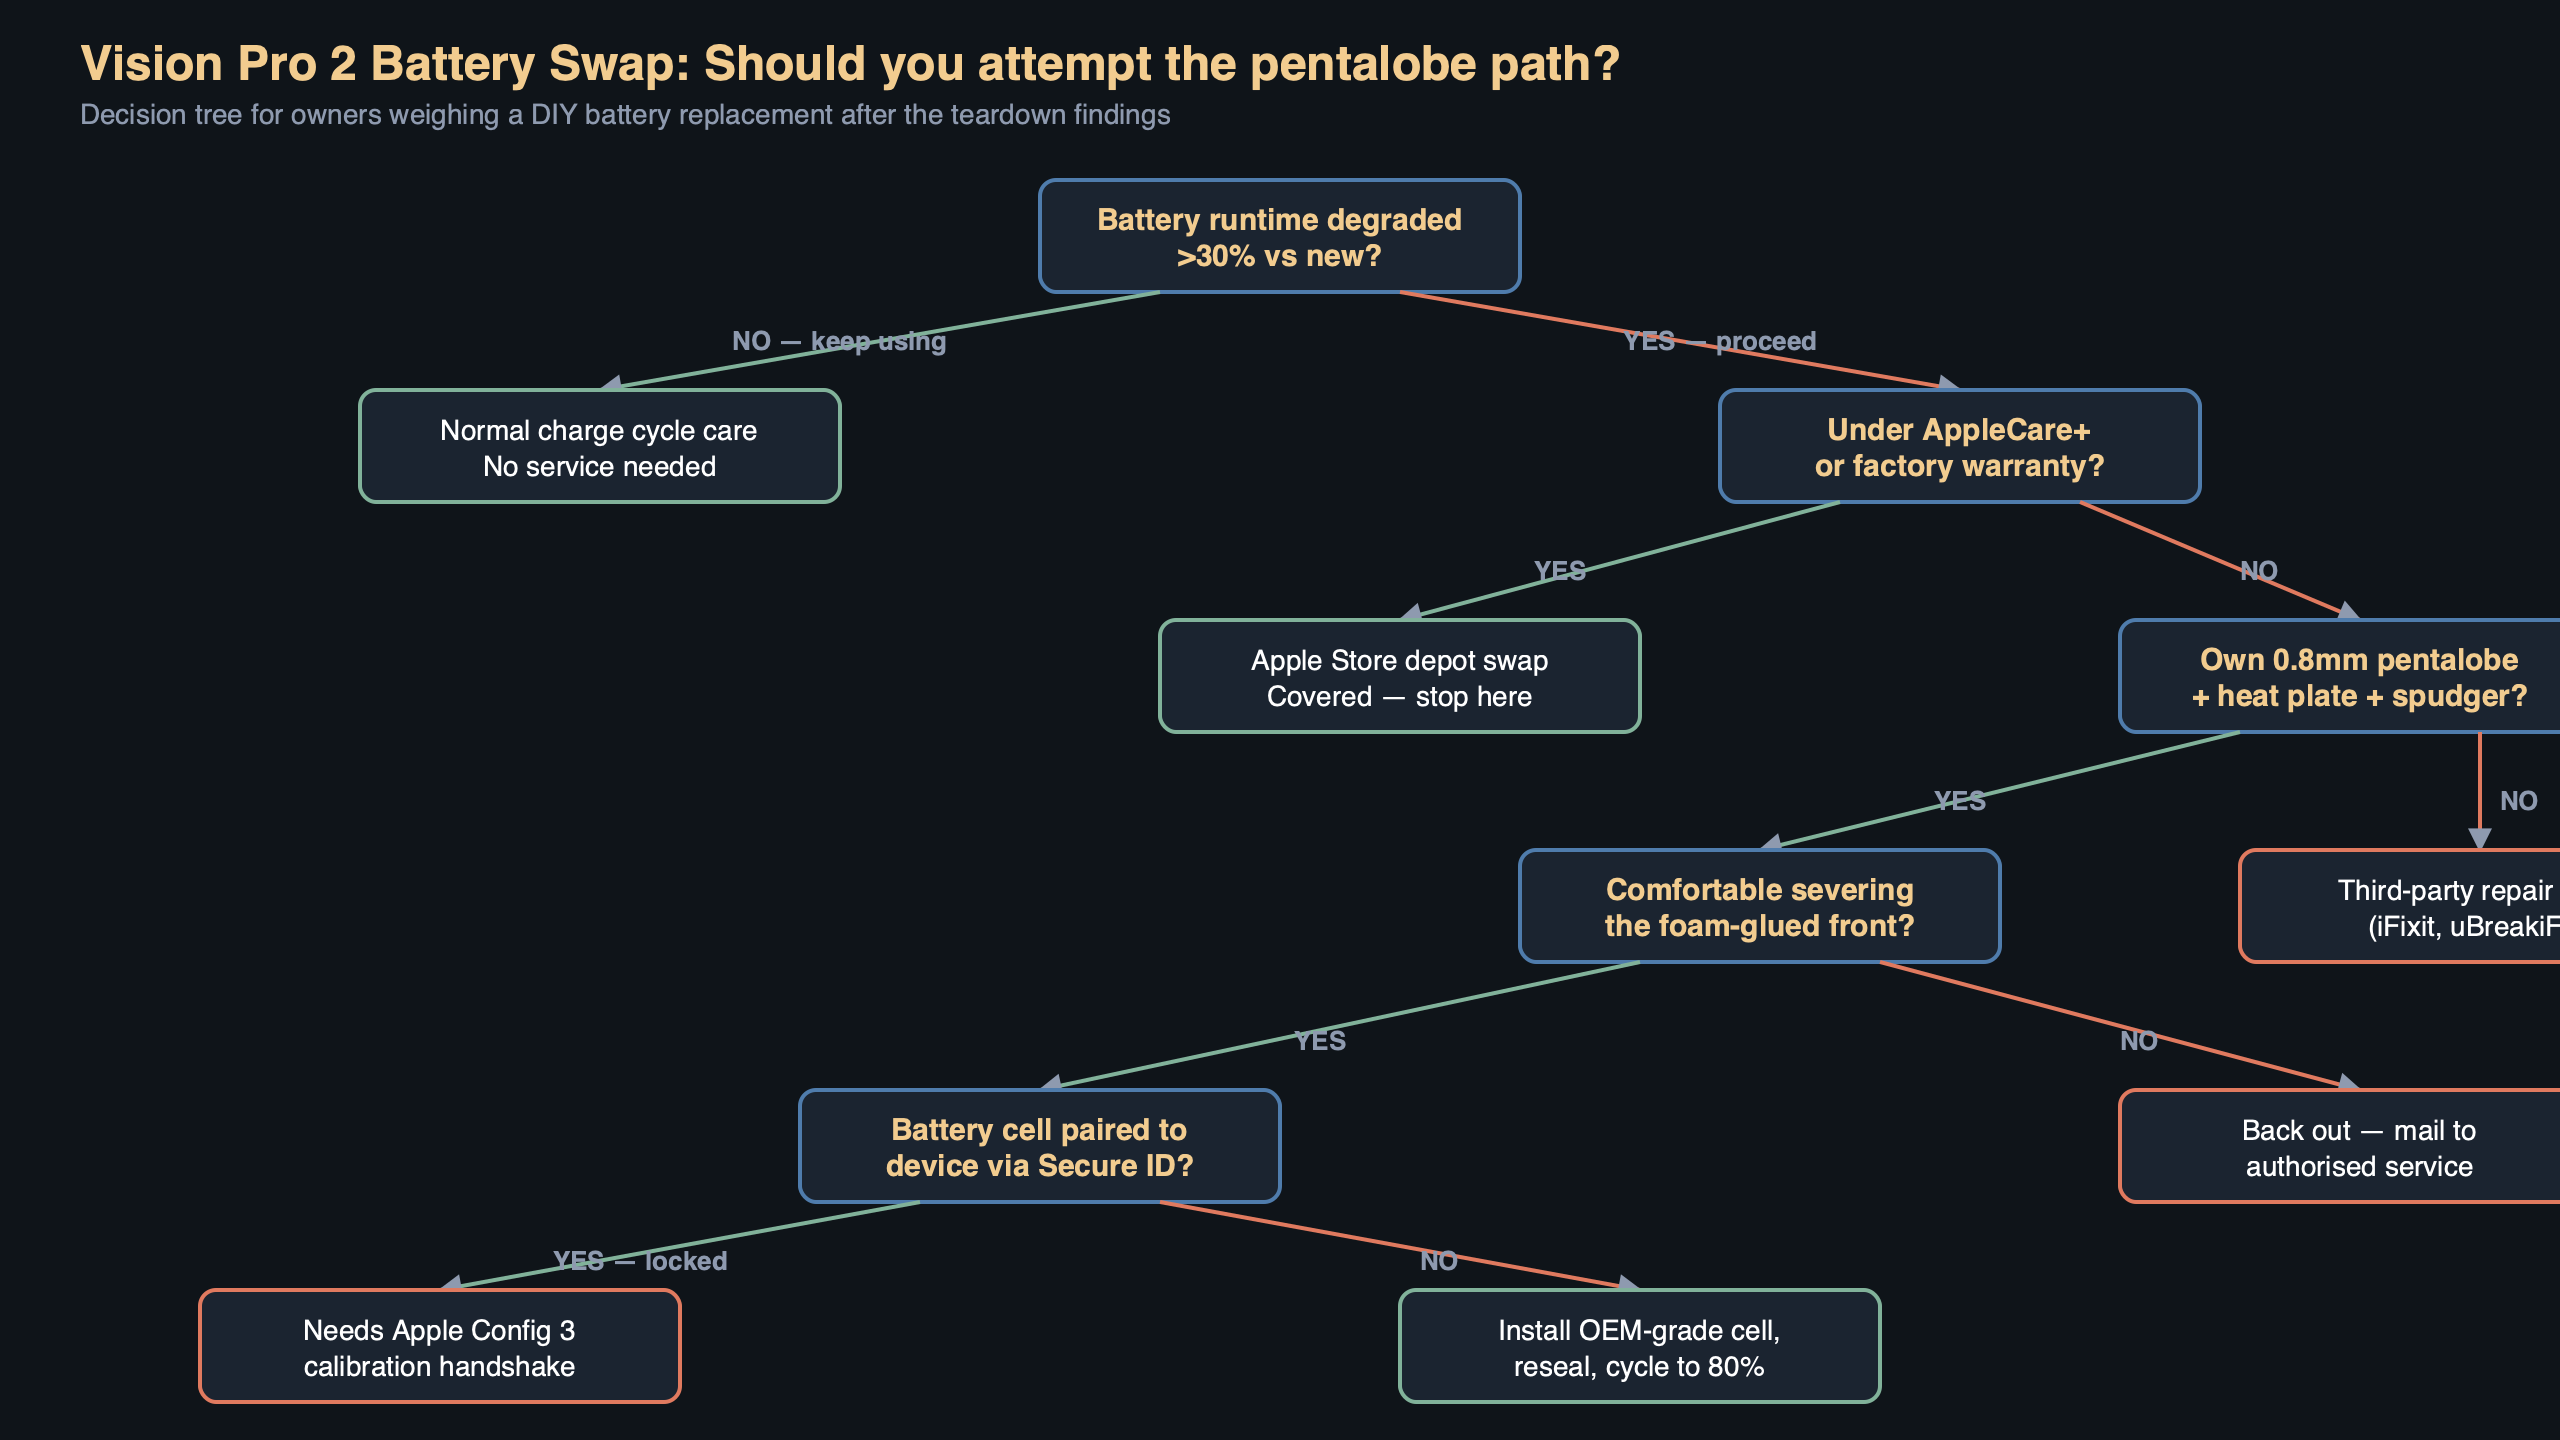
- Reconnect the cable to the headset and power on. Within thirty seconds visionOS will either show a normal battery indicator or the “Battery Not Verified” warning. If it shows the warning, you have to run the pairing step.
The pairing step that makes or breaks the swap
This is the part the teardown community has only figured out in the last few months. On the original Vision Pro, you could replace the pack and walk away. On the Vision Pro 2, you need to open the System Information panel (Settings > General > About > Battery) and trigger a “Configure new battery” flow. That flow only appears if the headset detects a BMS it has not seen before, and it only completes successfully if the replacement BMS is a genuine Apple part with an unblown configuration fuse.
A pulled pack from another Vision Pro 2 will not work for this reason — its BMS is already paired to a different headset, and visionOS will not let you re-pair a used BMS to a second headset. A brand-new Apple service pack from an authorized repair channel will work, because the BMS ships in an unpaired state. This is the same model Apple uses for iPhone batteries under the Self Service Repair program, and the Self Service Repair store overview describes the System Configuration tool you use to complete the pairing on supported Apple devices. The Vision Pro is not listed in that store yet, which means there is currently no sanctioned way to run System Configuration on a headset battery at all — you are relying on the in-visionOS flow instead.
What happens if you skip the pairing
If you ignore the warning and just keep using the headset on an unverified pack, two things degrade over time. The charge curve gets capped at about 60%, as noted above, and the headset disables the fast-charge path entirely, so a full charge goes from roughly ninety minutes on USB-PD to about three hours on the standard 5 V rail. Neither is catastrophic, but both make the headset noticeably worse to live with, and they are not something a subsequent visionOS update will clear — the warning is sticky across restores until a verified pack is attached.
Third-party cell replacement: why it is a dead end right now
The obvious question is whether you can replace the three 18650 cells inside a dead pack and keep the original BMS, which would preserve the pairing. Mechanically, yes — the tab welds come apart with a cheap spot welder, and the replacement cells are commodity parts. Electrically, also yes — the BMS will happily talk to fresh cells at the correct voltage. The problem is that the BMS firmware tracks cumulative charge cycles in non-volatile memory, and once a pack has crossed the ~1000 cycle mark, the BMS flags itself as “end of life” and refuses to deliver full rated current regardless of what cells are attached. That flag cannot be cleared without JTAG access to the BMS microcontroller, and the pads are not exposed — they are under the same epoxy that holds the sense leads.
For now, the only realistic vision pro 2 battery replacement path is a whole-pack swap with a new, unpaired Apple service part, done through Apple’s repair channel. Third-party repair shops can do the mechanical disassembly, but they hit the same pairing wall you would hit at home, and none of the major independent outfits have published a working workaround.
What this means for buyers and long-term owners
The practical takeaway is that the battery pack is now the part that determines the useful lifespan of a Vision Pro 2, and Apple has deliberately made that lifespan depend on its repair network rather than on commodity parts. If you are buying used, the first thing to check is the battery health readout in Settings — anything under 80% with a high cycle count means you are a few months from a forced service visit, and the out-of-warranty battery service on the Vision Pro repair page is not cheap. AppleCare+ is the only way to cap that exposure, and for a headset you intend to use daily it is the only sensible configuration.
If you are doing the swap yourself, buy a known-good P2 pentalobe driver, work on an anti-static mat, and do not touch the cells. The mechanical work takes about fifteen minutes; the pairing step is the part that decides whether your headset works afterward, and the pairing step only works with a factory-fresh Apple service pack. Anything else is a brick.
References
- Apple Vision Pro Tech Specs — official source for the 3166 mAh rating and runtime figures used as the baseline for comparing the two battery generations.
- iFixit Vision Pro Teardown — primary reference for the first-generation pack’s mechanical layout, which the Vision Pro 2 pack reuses for 60% of its external geometry.
- Apple Vision Pro Repair and Service — documents Apple’s official position that the battery is sold only as a whole assembly and establishes the out-of-warranty service pricing referenced in the buyer guidance.
- Apple Self Service Repair — describes the System Configuration tool and parts-pairing model that the Vision Pro 2’s in-visionOS battery pairing flow mirrors.
- iFixit P2 Pentalobe Screwdriver — specifies the 0.8 mm driver tolerance needed to remove the six perimeter screws on the new pack without stripping them.